Showing posts with label frugal. Show all posts

February 4, 2014

The Church Pew Revival

On New Years Day, whilst still in a vertigo fog, we had brunch with some dear friends.  Though much of the conversations were a blur, I do remember my friend Suzanne saying, "Gretchen, I don't want you to feel like you have to take it, but I have an old pew..."
In which she was interrupted with my over-eager YES!  I'll take it!!!

She described it as "chippy" and in need of some TLC.  
I like chippy.  And old.

 But the chips were falling off like snowflakes.  Chips that were probably fully leaded.  So I decided to give it a good spa treatment... of sanding.  Well, actually, my sweet farmer did the sanding for me.
Yes, I'm wearing "mom jeans" because the barn was freezing cold and I had 25 layers underneath. 

We buffed and cleaned and brought back her original beauty from the ashes of a 1976 mustard colored bad decision.
My original plan was to give it a glaze treatment but when I saw the price of glaze, I decided to try white washing it.
Because I wanted the grain of the wood to show through I combined
1 part paint/2 parts water
Using some leftover white paint we already had, this became a FREE project.  Woop woop!
 It turns out to be the best place to display my great-grandmother's quilt, too.

 It fits perfectly between the windows, separating our dining area from the living room.  Being over 7' long, I was sure hoping it would fit!

I'm so thankful my sweet friend couldn't find a spot in her home for this beauty.  I'll think of her every time I walk by.

May 24, 2013

Do You Antique?

Does the word "antique" make you smile or turn up your nose?  I have to admit the smell of most antique stores makes me wrinkle my nose.  Literally.  The thrill of the hunt is what keeps me coming back, even though 97% of the time I walk out of those places empty handed.

But then I run across an inspiration like this (at the local coffee house) and I suddenly want to search for an aqua phone and an old fan.
Isn't that the cutest display eva?  When I retire from motherhood (ha!) I think I'll open a coffee shop and create cute little montages like this.

There is a delicate balance between using antiques with discernment and having antiques that scream J.U.N.K!  It is important to find things that share a common ground.  In the photo above, it is the light aqua color and school day charm.  

I've started a collection of enamel pots above my kitchen cabinets.  Don't get grossed out, but the pot  with the red handle is the pee pot my husband's father used growing up. Yes, it's been washed.  I think it's pretty cool.  The others have been yard sale and antique store finds.  

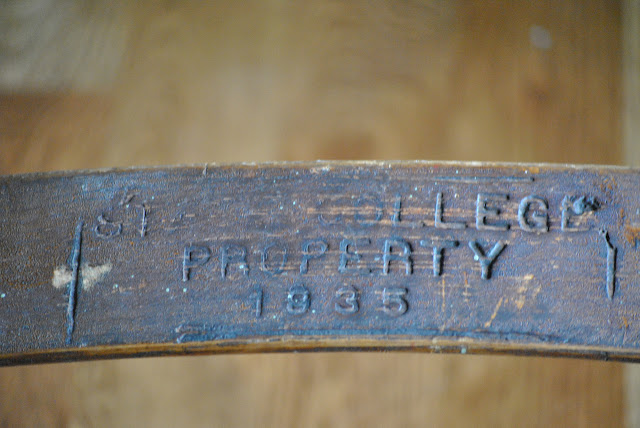
Speaking of my father-in-law... he found a ladder back chair for me.  When I turned it around, I found this gem on the back:

"State College Property 1935"  Oh the learning that occurred in that chair!

I love that some antiques have a story that speaks for itself.  I recently ran across a quilt that had been lovingly made by a group of women.  They each stitched their signature on the squares they had quilted.  Oh the conversations that occurred at that quilting bee!  Totally regretting not purchasing the quilt, by the way.

The best thing about antiquing is finding something that you know you can use with something you already have.  Old and new.  It's a beautiful combination.

Check out this idea, again, from the coffee shop:
 A-mazing.  Painted pallet.  Bike on the wall.  Red watering can.  Sigh.

May 20, 2013

Summer ReFresh (without buying a new couch)

  Do you feel refreshed when you walk into your living room?  Do you wish you could create a new space without spending a fortune? Now that the summer months are upon us, you might be dreaming of a light and bright space, but your big brown couch is in the way.

Let's suppose you are starting with a basic brown couch, like this Ikea Ektorp.
Most of us can't afford seasonal couches, so today we are going to see how modifying just a few accessories can completely change the feel of a room.  
Let's suppose we started with this:
The lamp is a good starting point because the base is neutral enough to go with any color scheme.  The shade can easily be changed, but as you will see, it can look fabulous (as-is) when paired with the right side table.


By adding just a few accessories, this winter couch can become a summer delight.
 Shop the house before heading out to buy. Many of the small accessories might be something you have around the house.  If your room is still feeling dark or heavy, try adding a mirror to reflect more light throughout the room.  Your budget may allow for new end tables, but before you purchase, see if what you already own can bring new life into the room.  You might have a small table hiding in the attic that could be painted back to life.

Don't let that old couch get the best of you!  Bring on the summer fun!


February 28, 2013

Easy Mod Podge Flower Craft

 Ready for something easy, fun, and ADORABLE?!  We did this craft with a couple of my girls' friends and I couldn't have been more happy with how they turned out.

Supplies:
   blank canvas (we used 12x12)
   mod podge
   scrapbook paper
   acrylic paint
   sponge brush
 I googled "flower petal template" and printed off two different sizes of the same petal to use as my pattern.  We went through our old scrapbook paper and chose some fun, bright colors with small patterns.
Michaels sells 12x12 in packs of 7 for $20.  With my 50% off coupon, it was a CHEAP craft!  Woot woot!
The hardest part was deciding the background color.  Once the girls got over that hurdle, the fun began.  I let them decide how many flowers and what size they wanted their flowers to be.  The only advice I gave them was that the center of the flower didn't necessarily have to be in the center of the canvas.  I think it looks more whimsical to have it off centered.
I love how different each one turned out.  The girls' personalities really fit their art designs.  

 This is the one my daughter made for her new zebra and pink room.  Love.

My son wanted to get in on the painting part, so I let him choose a color and paint my canvas.  He chose Poppy Red.  Double love.
 Directions:
1. Paint canvas with color of your choice.  Personal opinion: the bright colors look best
2. Cut out petals out of regular weight paper (not cardstock)
3. When paint is dry, arrange petals.
4. Using sponge brush, "paint" bottoms of petals with Mod Podge to make sure they adhere as the MP dries.
5. Generously cover entire canvas with Mod Podge.
6. Enjoy your masterpiece!

*I am not affiliated with ModPodge.  Just have a slight obsession!

I'm joining the party at Imparting Grace, 504 Main, Common Ground

February 17, 2013

Easy $4 Craft with a Punch

Remember my "Happy Wall"?  You can learn how to make your own geometric circle art here.  Toady I'm going to show you how I made the two photos at the top of the wall.
Super easy.  Super cheap.  Super fun!

1. Order/print 5x7 black and white photos of your choice, onto regular photo paper.

2. Choose a wooden plaque or board.  I found these wooden plaques at Hobby Lobby for $2.99 each.

 3. Be sure to place a tack under the corners so that you can paint the edges without the wood sticking to your surface.

 4. Choose your favorite color and paint with the grain of the wood.

 5. Center the photo on the wood.  Apply a coat of ModPodge under the photo and over the photo.  It will look murky when you apply it and you might, hypothetically, think "I've ruined it."    Not to worry, it will dry nicely:
Left plaque: wet ModPodge   Right: dry(ish) ModPodge

The color and shape options are limitless.  I am thinking about making a set of these to go in the bonus room.  Guess I'll have to make another trip to Hobby Lobby! ;)

*I am not an affiliate of ModPodge (which I pronounce MODGE PODGE every single time!) or Hobby Lobby, just a fan.

I am linking up with The Dedicated House and Craft-o-Maniac and Coastal Charm and Girl Creative and Imparting Grace

January 29, 2013

Teen Room Reveal


We moved to the farm in October, and by the last week of December, we were already starting our first makeover project.  Seriously, we. are. nuts.  But there is a GOOD, sweet reason.  That reason is my precious 13 yr old daughter.

When we built the house, we decided to paint her walls grey and use her hot pink duvet cover.  
Hot pink and grey sounded so hip/cool/teenish in theory.
But when we moved in, it really wasn't working.  My sweet girl never complained, but I could tell she didn't love it.  I didn't either.  Several people mentioned her "lavender" room and we both cringed because neither one of us love that color. I think the reflection of the hot pink onto the grey resulted in lavender.   So one day I suggested that she look at Houzz.com and show me rooms that caught her eye.  Unbeknownst (what a big word) to her, all of the rooms she showed me were hot pink and black.  
So we came up with a plan.
My talented husband spent his vacation days measuring and applying firring strips to the wall.  We then painted the lower 3/4 of the walls white (glossy trim white) and the upper 1/4 Tricorn Black (SW6258).   If this technique looks familiar, there is a reason.  We did this same color combo on our son's room in our last house.

She was thrilled with the results.

With the board and batten, the room feels bigger, yet more cozy.

As usual, we were doing this makeover on a very tight budget.  So we chose items that would really give the room the punch it needed.  The zebra sheets and sparkly turquoise pillow were a gift from my mom.

The zebra clock is from Dollar General.  Crazy find!  
The zebra lampshade on her desk came from Garden Ridge, $7.
Curtain tie back brackets were a clearance find at Ross, 2 for $2.99
The deal of the century were the IKEA curtains.  Two 96" curtains for $9.99.  Glory hallelujah!

Making a space your own doesn't have to cost much.  You just have to be willing to look in odd places.  ;)
It's hard to believe she's already a teen.  Rather than wish she were little again, I'm trying really hard embracing this season of life.  Because, after all, every season is beautiful when it is filled with life!

Linking Up With
Southern Savvy Style, Elizabeth and Co., The Winthrop Chronicles, If It
s Not Baroque  Home Stories AtoZ, Imparting Grace

January 28, 2013

DIY Canvas Geometric Art


I have searched high and low for bright, happy art.  It is hard to come by, especially on a budget.  I've seen a couple of geometric patterns online but I wasn't crazy about the dark colors.  I decided to try my hand at it.

This project takes a little time, but it is worth it in the end.  The hardest part, for me, was the math.  Lucky for you, I've already figured it out and you can just use my measurements. :)
 I started with an 18x24 canvas.  AC Moore had a sale right after Christmas and this size was 3/$10.  Score!
Place a thumbtack underneath each corner.  This will help you keep your paint from sticking the canvas to your workspace. 


Using acrylic paints, liberally cover the canvas with your base color (white). 

Use a ruler and a level to find the center of the canvas.  Draw the lines with a pencil.

 Now measure and mark every 2" from the center lines.  Your canvas will then look like giant graph paper.

 Using a compass, draw 2" circles with the center point being the cross section of the squares of the "graph."  Overlap the circles as shown below.
  When you finish, it will look like this:

I decided that the predominant colors would be blues and greens, with warm colors mixed in.  Therefore, I started with the green, randomly painting different "leaves."
 I didn't pre-plan the color pattern.  It really is just RaNdoM.  The only rule I followed was that no two leaves of the same color could touch each other.  I used 3 shades of green and 5 shades of blues, adding a poppy red, tangerine orange, butter yellow, and a pink.
Once I finished with the colors (two coats each) I erased my "graph lines" and painted the centers with white to smooth it all out.  I also used white to clean up the edges of the canvas.  As you can see, it's not perfect, but hey, it's art!
This is my HAPPY WALL

Linking up with:
Craft-OManiac, Keeping It Simple, Sumo's Sweet Stuff, Homemade On a Dime, Under the Table Dreaming, Skip to My Lou, Flamingo Toes, 504 Main, DIY Home Sweet Home, Girl Creative, Today's Creative Blog, Home Stories A to Z, The Dedicated House, Coastal Charm, A Bowl Full of Lemons

April 30, 2012

Laundry: Loads of Fun

Have you seen the make-your-own-laundry detergent on the internets lately?  I thought I'd give it a try.  It's super easy and actually a fun activity to get the kids to do.
 Here's what you need:
4 lb box Super Washing Soda
4 lb 12oz box 20 Mule Team Borax
3 lb tub of OxiClean (I used the Sun brand which is much cheaper)*
4 lb box Baking Soda
3 bars of Fels-Naptha (found in the soap aisle and the detergent aisle at Walmart)**

This makes a LOT, so use a big pot to mix.
Grate the soap into the mix.  My kids wondered why I was grating cheese in the bonus room. ;)  Then they wanted to join the fun!
 That's it!  See, I told you it was easy!  :)
I stored mine in a 12.7qt box (found at Walmart) and it was the perfect size!

 It only takes 1-2Tbs. per load, depending on load size.  I just use the scoop that came in the OxiClean.
My husband didn't know that I had made it and the other day he said, "I love that new detergent!"

This is what I like about it:
~ Cost effective.  It was about $20 to make, and according to several other Pinteresters that have tried it, it lasts about 9 months!
~ Smells FRESH!
~ No fillers.  Judging from the variety of sizes/loads the name brand bottles boast, there doesn't seem to be consistency on what I was getting for the price.
~ It works!  Now that we are spending lots of {muddy} time at the farm, I put my detergent power to the test.  No stains!  Yay!

Don't be alarmed when you don't see suds.  In fact, you can use this in a HE front load machine because there are no/low suds.  No more buying that "special" expensive HE detergent.    Just be sure to check your owner's manual, as some front load machines have a little liquid detergent drawer than will need to be removed.  For more FAQ's, check out this great website.


*The OxiClean is optional.  I couldn't find a 3lb tub, so I just bought the 6lb tub and used half of it.
**In place of the Fels Naptha (yellow), you can also use Ivory bar soap(white), or Zote (pink).  I have heard that Home Depot carries the Zote.  It's really just a preference of smell/color.