February 20, 2014

Mudroom Makeover

I'm not sure it should be called a makeover since it wasn't ever really "made" to begin with.  When we built our house 16 months ago, our mudroom was all function and no flare.  It served a purpose, albeit a good purpose, but it wasn't welcoming.

Before:

Every person in this family walks through the mudroom at least twice a day, so I wanted it to be a place that inspired on the way out and welcomed on the way in.

After:
We had some leftover wood from our keeping room ceiling, so we decided to add a little character to the wall.  I would prefer white, but this is a MUD room and mud is BROWN.  We make a lot of dirt on this plot o' land so practicality wins again.  I'm okay with that. :)
 I needed an inexpensive way to fill up 16' of bare wall space.  Thanks to Melissa, I found these maps at Paper Source.  They are actually considered wrapping paper, but they look and feel like real maps.  I will probably add more eventually, but for now I chose maps of the world, the U.S. and places I've visited.

I love the colors and texture it brought to the space.
This is a very functional room in our home so I wasn't sure it could feel warm and inviting.  We use this room to wash eggs, feed the dog, and drop the coats and shoes.
We recently added a new granite countertop (I love small scraps that can't find a home!) that our granite-guy friend cut grooves into for egg drying.


This space also leads to the half-bath.  With so many events at the farm, we are constantly pointing people to the bathroom.  I made this little sign to help them find the way:

A little metal frame found in the dollar section at Michaels, a Sharpie, and a fun ribbon made a quick little project.

For the first time since we moved in, I finally really like this space.  Instead of the mudroom, I'm thinking of renaming it the welcoming room.  Doesn't that sound better?

I'm linking up with Imparting Grace today.

February 14, 2014

My Heart is Full

Today my heart is full.  Our area of the country was blessed with my favorite gift of God's creation: a blanket of snow. 

As the snow clouds gathered, school was called off early.  I think my kids were excited to spend some time together.
It blew in fast and hard.  So many of our friends were stranded on the road, trying to scurry home.  My farmer made it home without any issues, but there were so many people in our area in trouble.  We heard there was an accident near the major intersection about a mile from our house so we decided to set off on a long hike to offer assistance.
It was so eerie to see the road so desolate at 5pm, when it is usually packed with vehicles.  The accident must have been beyond where we could see because the intersection was empty.
We still had fun hiking though!
 Together, with snow, and laughter makes me very, very happy.


As the snow blew against the house and the wind howled, my heart filled with joy.   I don't know why this kind of weather makes me so happy.   I know some of my friends can't stand snow/cold/ice.  I sort of feel that way about sticky/humid/heat.  Isn't it amazing how God creates us all so uniquely?!  
 The storm came on Wednesday afternoon, and as I type this on Friday afternoon it is melting away.  We have to savor it while we can!


My favorite photo of the day

I even took a little hike by myself.  I love the silence a snow brings to the earth.


On this Valentines Day my heart is full.  I've had my chicks under one roof.  We've played, we've eaten (too much), we've rested.  We've been together.  I tuck this into the bank of sweet memories to cherish.
Happy Valentine's Day!

February 10, 2014

Realistic Homeschool Tips

We are currently in our 5th year of homeschooling.  Multiply that times 3 kids and that means I've officially homeschooled every grade from kindergarten through 8th grade.  For a mom who thought she would NEVER homeschool, it has turned out to be a great option for our family.
I have recently had some opportunities to encourage a handful of newbie homeschool moms.  After reflecting on our various chats, I thought I'd share some tips that were a common thread of those conversations.

1.  You will constantly doubt yourself.  I know that doesn't sound very encouraging, but I want to be real, straight from the beginning of this lil' conversation.  I doubted myself until the day I sent my oldest child to high school.  Did I teach her all she needs to know?  Did I forget something important?  Am I ruining my child?  Is every other homeschool parent doing it this way?  Seriously, what AM I doing??   It is normal to feel this way, but don't let those doubts take over.  Remember, if you've been called to homeschool, you were made for this.  Rise to the occasion and shine.

2. Give everyone a break, everyday.  No, I don't mean you need to take a half-day of vacay.  One of the best pieces of advice I received was to create an hour each day that we were apart from one another.  I know that sounds like a long time, but it is really worth it.  Everyone needs some space and when you homeschool, you are with each other 24/7.  To keep the relationships healthy, we "took a break" each day.  Most days I would require them to read quietly for 30 minutes (45 as they got older) and then they could spend the remainder of the time doing whatever they pleased.  The rule was that everyone had to be in a separate space.  For us, that meant each child was in their own room.  I explained that it wasn't punishment, but rather a tool to help us enjoy each other's company the remainder of the day.  Mom is no exception.  Unless they were bleeding or dying, they knew to give me my space too.

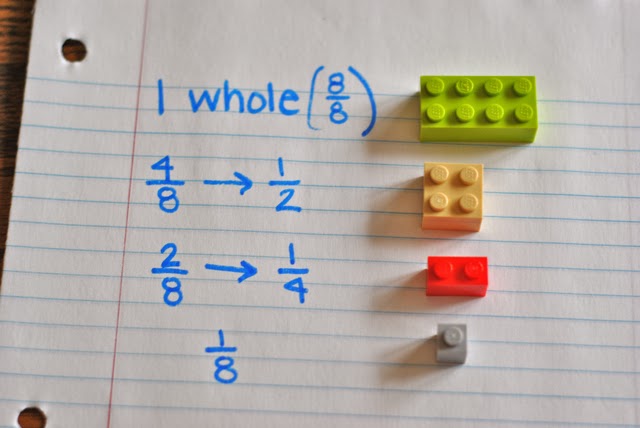
3. Speak their language.  Sometimes we have to get a little creative to capture their attention.  The picture below is a perfect example.  My son had no interest in fractions, because really, who cares how many ways you can slice a pizza, until the day I said we would use Legos to learn math.  

4. Stalk Pinterest.  You don't have to reinvent the wheel.  Pinterest is FULL of ideas for every subject and grade.  There are a ton of free printables and learning game ideas just waiting for you to discover.  We use the printable pictured below to practice spelling words.  
4. There will be bad days.  Okay.  There will be bad weeks.  But hang on.  Even the best homeschool parent wants to throw in the towel every once in a while.  Give yourself some grace.  Keep the big picture in mind and take a break if you need one.  Just because you have a bad week doesn't mean you are a failure.  Rock on!

5. Incorporate chores into their school day. During our first year of homeschooling our biggest battles weren't fought over spelling words or math problems.  We battled over chores constantly.  Some days they were full sized wars.  Other days the request to put away the clean dishes was met with major eye rolling or sighing.  I began to include one or two chores into their assignment list.  Guess what?  They never questioned it or complained.  For some reason (which I cannot explain ) if it was included with the school work they didn't contend it.  Once I discovered this little gem, I used it unashamedly to my advantage.  There were chores that went without saying such as making their beds etc... but I decided to use their list to incorporate a variety of chores/skills that they needed to learn.  Some examples were dusting the floor boards, mopping the bathroom floor, sweeping the porch, washing the dog.  

6. Discover together.  I have learned more in the past 5 years than in all of my years as a student.  When you get excited about learning something, it will be contagious.  Sometimes it is easy to "just get done."  Yes, the core subjects are important, but don't lose your child's zest for learning over checking off the list.  Carve out time to study something that is interesting... just because!  Reading and study skills are being sharpened without them realizing it!  We recently discovered these books.  I love books that ask questions to get the reader thinking.  

Speaking of asking questions, this is a WONDERFUL series for kids of ages 7 and up.  Great questions (some of which I've wondered myself) with excellent explanations!

7. Use your library.  I may be stating the obvious, but our library card gets a better workout than a Jillian Michaels DVD.  Rotating the books keeps your students interested.  Find books that go with what you are studying in history and science.  Even if your kids don't read them, make them available for visual learning.  Teach them how to do research using a simple book, then when it comes time to do a research paper they will have the skills needed.

8. Rotate learning toys.  For those of you who are starting out with young ones, utilize what you already own.  Collect the puzzles and learning toys.  Store them away and then pull out a handful of "new" games/toys/puzzles each week.  You will be amazed at how excited your children will become over a game that they haven't shown much interest in when it was sitting in their rooms.

9. Homeschooling can be lonely.  I think this was the most surprising piece of the homeschool puzzle.  I am not saying this to discourage you, but no one prepared me for this feeling.  Depending on how many co-ops and extra-cirricular activities you are involved in, you may find yourself feeling like an island.  There is a delicate balance between being involved in too much and isolation.  Because we didn't start out homeschooling, I felt that many of my friends who had children my kids' ages were already well established in their own groups.  I found that it was important that I built and maintained friendships that were not necessarily tied to homeschooling.  Of course there are fabulous friendships formed through the common thread of homeschooling, but it is important that we do not become an elitist group.  I strongly encourage my kids to make friends with kids from various schooling backgrounds.  This really helped when our oldest began public high school.
As a mom, I encourage you to be wary of isolating yourself.  You are pouring your very being into your children, but one day those children spread their wings and fly.  You don't want to be the only chicken in the coop when that happens.  (I love chicken humor, don't you?)

10. Enjoy it!  The days are long but the years are short.  Savor the moments.  Do things your kids will remember.  Get outside.  Take hikes and practice math facts.  Spread a blanket out in the sun and read aloud together.  Pull out the art supplies and create together.  Revel in these wonder years.  They are a gift.

February 8, 2014

How to Host a Craft Night

Earlier this fall my husband and I joined a new life class (modern speak for Sunday school class).  Even though we had been members of our church for 20+ years, we suddenly became the new people.  It was a little strange to find us introducing ourselves and trying to find our niche; but we found a wonderful group to do life with.  After just three short months, we had wiggled our way in enough for the class leader to ask me to host a craft night.  I eagerly said yes, after all, it was a great way to really connect with the other ladies in the class ... and well, CRAFT!  
Obviously there was a great desire for crafting because 25 ladies signed up!  It was a huge success so I decided to share my thoughts with you.  
 1. Plan ahead.  I'm not a big planner, so this was the hard part for me.  Make a list of all the supplies you will need.  Prepare yourself that you might have to visit more than one craft supply store.  Before I realized the crowd would be so large, I decided on three crafts.  In retrospect, we could have just done two, but it worked out fine.
2. Know your budget and stick with it.  I originally told the ladies it would be "around $10."  Our actual cost ended up being $11.75 each.  With that many women, the extra $1.75 adds up quick, so I couldn't just cover the extra cost.  Thankfully, the crafters were gracious about the expense.
 3. Provide written directions.  This will help with the chaos of everyone asking a million questions at the same time.  It won't eliminate questions, but there will be fewer.  It also helps the visual learners.

 3. Create designated spaces for each craft.  While we were preparing the house for the night, one of my kids said, "you're putting people in the laundry room?!"  With such a large crowd, we filled the whole downstairs!  By keeping the personalized coaster craft in one room, it helped contain the mess supplies.

4. Ask for help.   I only provided coffee and water... and crafts.  I asked each crafter to bring an appetizer or dessert and a glue gun. I even designated the coffee creamer.  Some brought homemade food, some brought store-bought.  One even brought some fun sparkling waters.  It all works out!
 5. Plan on mess, questions, and lots of laughter.  Crafting is messy.  Once you get over it, you will enjoy it so much better.  Sometimes even the most experienced crafters will have "silly" questions.  There is really no such thing as a silly question.  Let them know it's okay to ask for help.  You want them to go home with a craft they are proud of, not something that is disappointing because they weren't brave enough to ask a question.

When women have fun, we get loud.  Prepare your family (if they are hiding out upstairs like mine were) that it will be loud.  My husbands said he could tell we were having a lot of fun because we sounded like cackling hens.
6. Keep the fellowship flowing.  Choose crafts that aren't so labor-intensive that it suppresses conversations.  Our main craft (most time consuming) was the coffee filter wreath.  Once everyone got going, it was the perfect craft to chat through.  One of the ladies said, "I like that this is a mindless craft so that we can talk to each other."

7. Encourage creativity.  Some women will want to follow your example to the T.  Others will venture down their own little creative path.  I loved making the personalized coasters because each crafter got to choose their own paper pattern and monogram color.  There were so many beautiful, unique finished products.  Each one truly fit the owner's style.

8. Realize that each person crafts at their own pace.  The coaster craft made me realize this truth.  What I expected to be a ten minute craft ended up taking some of the women 30+ minutes to accomplish.  That is okay.  The important thing is that they accomplished it!  If you see someone lagging behind, just encourage her or help her make a decision.  Sometimes we just need someone to say, "Hey those two colors look great together!"

9. Start the evening organized and then let the chaos ensue.  Before we began the crafts, I gave directions to everyone, altogether.  This prevented me from having to explain the same craft 16 bajillion times.  I also made sure everyone knew where the bathroom was located and that the coffee was decaf, very important details. 
The craft station tables were labeled with a number. Before we began, each person drew a number (1-5) and then went to that table respectively. This helped with the whole "mingling" thing.  With 25 women, I had 5 craft stations (3 of which were the same craft) with 5 women at each station.  It mostly worked out that way.  Because of space, one station had four at a time with another holding 6 at a time. Once they finished their first station, I let them choose where they went next.  That way they could connect and chat with new friends.  Flexibility will be your best friend.  
10. Relax and enjoy.  If the hostess is stressed out, no one is going to have fun.  Use these simple steps to help you enjoy the gift of friendship.  Craft on!!!

I'm linking up with The Dedicated House, A Stroll Thru Life, Chicken Chick, Cozy Little House, Imparting Grace

February 4, 2014

The Church Pew Revival

On New Years Day, whilst still in a vertigo fog, we had brunch with some dear friends.  Though much of the conversations were a blur, I do remember my friend Suzanne saying, "Gretchen, I don't want you to feel like you have to take it, but I have an old pew..."
In which she was interrupted with my over-eager YES!  I'll take it!!!

She described it as "chippy" and in need of some TLC.  
I like chippy.  And old.

 But the chips were falling off like snowflakes.  Chips that were probably fully leaded.  So I decided to give it a good spa treatment... of sanding.  Well, actually, my sweet farmer did the sanding for me.
Yes, I'm wearing "mom jeans" because the barn was freezing cold and I had 25 layers underneath. 

We buffed and cleaned and brought back her original beauty from the ashes of a 1976 mustard colored bad decision.
My original plan was to give it a glaze treatment but when I saw the price of glaze, I decided to try white washing it.
Because I wanted the grain of the wood to show through I combined
1 part paint/2 parts water
Using some leftover white paint we already had, this became a FREE project.  Woop woop!
 It turns out to be the best place to display my great-grandmother's quilt, too.

 It fits perfectly between the windows, separating our dining area from the living room.  Being over 7' long, I was sure hoping it would fit!

I'm so thankful my sweet friend couldn't find a spot in her home for this beauty.  I'll think of her every time I walk by.